Frame Reconstruction on a '69 Convertible
Donna's convertible has been somewhat neglected the past couple of years. Other than some early spring and late fall driving, it hasn't seen much road use. So in summer 2006, I decided to take the convertible to the All Ford Nationals at Carlisle.
The convertible's carpeting was pretty rough, so replacing it was one of the prep items for the trip. However, removing the carpeting revealed some nasty surprises. Almost all the floor pans had been patched with a thin layer of galvanized sheet metal or an equally thin layer of fiberglass matting. To make matters worse, a previous leak from the convertible top's hydraulic systems had soaked all of the fiberglass patches and destroyed the bond between the fiberglass and the metal. A much closer inspection of the car found a long hole in the inner convertible rocker rail and ended the convertible's chance for a long awaited highway romp.
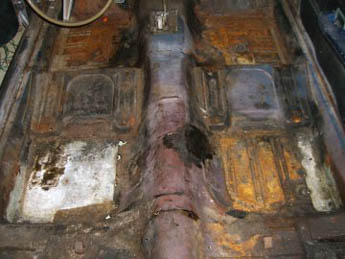
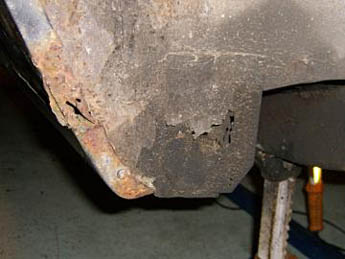
 At first glance these floors don't appear to be that bad. Not pristine by any stretch of the imagination, but the only damage not hidden by fiberglass or sheet metal is the rotted out back of the driver side seat pan.
It also ended all other excursions in the convertible for that matter, as the Cougar wasn't safe to drive with that much damage. After getting back from Carlisle, the convertible received a thorough inspection. The results were depressing, but not insurmountable. Every floor pan from the firewall to the convertible top framing was rotten, as was the driver side seat support. The driver side convertible rocker rail had to be replaced and the outer cover of both of the rear torque boxes needed replacement. About the only thing that saved this convertible from being carted off to the scrap yard, beside the owner being too stubborn to quit when he's behind, was that the frame rails and most of the sheet metal were in good shape. It has Flintstone floors, but the front is still solidly connected to the rear.
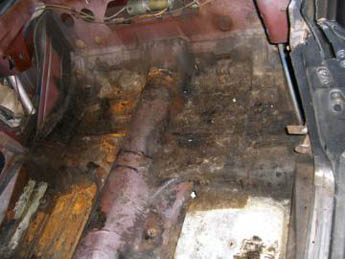
 The fiberglass successfully hid a lot of problems, particularly on the driver's side of the car. While the holes are bad enough, most of the remaining metal is very thin due to rust chewing a lot of material away. Except for the transmission tunnel, pretty much everything needs replacing under the rear seat.
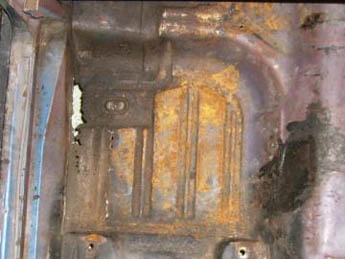
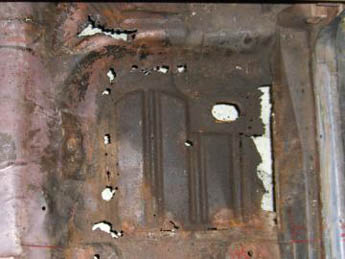 The rear floor boards were a little better overall, but still not worth saving. The driver's side is obviously toast, and while the passenger's side seems better, it has a lot of pin holes that are on the verge of becoming potholes.
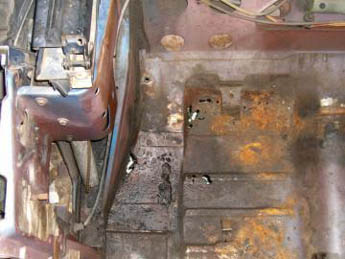
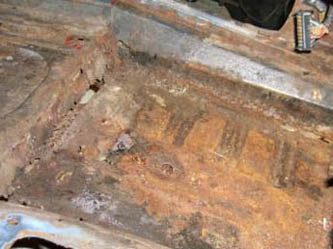 This is the driver's side front floor pan. Look closely at the upper left of the photo—that tan area at the base of the seat support is the garage floor. Not only is the seat support rusted out, the floor pan underneath also has rusted away.
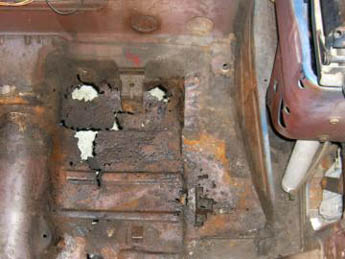
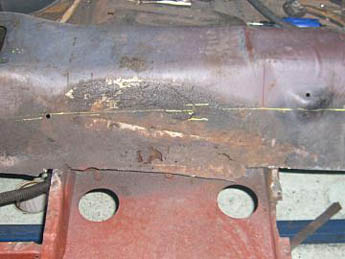
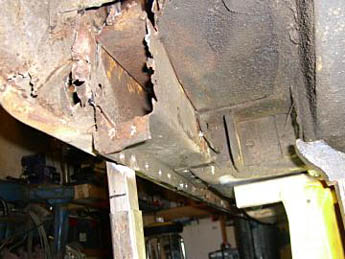
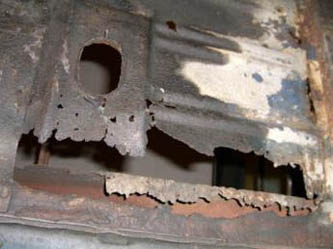 This is what revoked the convertible's road privileges. Not the hole in the floor pan, the hole in the inner frame rail. Like the floor pans, the bottom part of the driver's side inner rocker rail is mostly eaten away by rust. Replacing the inner frame rail is first priority on the repair list.
This car needs a lot of work but the critical item is the inner rocker rail and it is the first item to be repaired. This repair project has several stages. As noted before, the inner rocker rail is first, then the driver side rear torque box cover will be replaced, then the floor pan will go in, followed by the seat support and finally the area under the rear seat will be replaced. The same steps, except for the rocker rail replacement, are required for the passenger side. Due to the length and amount of work involved, this article is just about replacing the inner rocker rail. Replacing the rear torque boxes and the floor pans will be covered in another installment.
One note of caution: Replacing an inner rocker rail is an advanced project. Replacing the inner rocker rail requires disconnecting the engine frame rail from the rear frame rail. It is within the ability of an experienced backyard mechanic, but it pretty much pegs out the difficulty meter.
One key item for a project of this magnitude is preparation. This isn't a weekend project. The convertible should not be moved while the inner rocker rail is out of the car, so plan on the convertible being up on jack stands for a several weeks. If you are doing this solo or can only work on it on the weekends, it can easily take more than a month, which means a place to safely leave the car on stands during the repairs is absolutely essential. A safe storage area to put the parts during the repair process is also essential. The last think you want to do is damage an interior piece with welding slag, grinding sparks, or a piece of sharp rusty metal.
Getting Started
Disassembly is the first step for this project. Replacing an inner rocker rail disconnects the engine frame rail from the rear frame rail so removing stress on the chassis is very important; removing as much weight from the vehicle reduces the chances of the body sagging or twisting while it is cut apart. The transmission, drive shaft, and leaf springs also get in the way during the repairs, which is another reason to remove them.
For the sake of brevity, I'm going to summarize the next steps, several of which could be complete articles by themselves. Remove the radiator, engine and transmission, followed by the front grill, the splash panel, the front valence and both front fenders. Except for the hood, pretty much the entire front clip is removed. After that, remove the doors and the entire interior. Because the damaged inner rocker rail is on the driver's side, the steering column, the emergency brake mechanism, driver side quarter window and mechanism, and the driver side air vent also have to be removed. At a minimum, the driver side top cylinder has to be moved out of the way, but it is better to remove the entire system; it comes out next.
Either tape heavy cardboard over the passenger side interior quarter panel side to prevent welding slag from burning through the watershield and scoring the quarter window glass, or remove the passenger side window, regulator and guide. Cover the convertible top with cardboard for the same reason. Remove the tail light harness from the top of the side rail and put it into the trunk. Remove the spare tire, jack and trunk pad, then drain and remove the gas tank.
Next, weld 1" square tube between the door jambs and across the interior of the car. Weld the door bars to the interior side of the door jambs. Weld the cross brace near the top of the rear door jambs so it will be out of the way when working on the car.
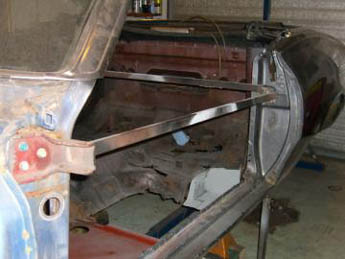
 Since I have several 1969 Cougars, I made braces that bolt in place instead of welding the bars across the door jambs. If you have several of the same body style cars to restore this is a nice touch but the simplest solution is to weld bars along the inside of each door jamb and a bar across the top. A fourth bar going diagonal across the body is recommended but it would get in the way too much for this project, so it was left off.
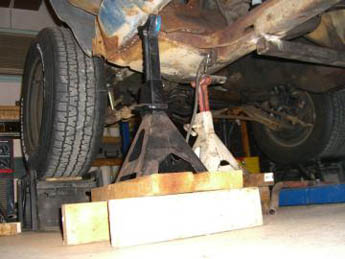
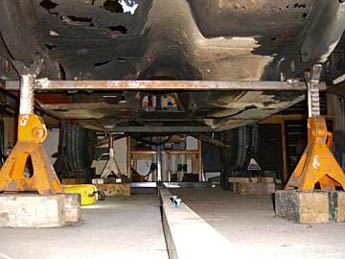
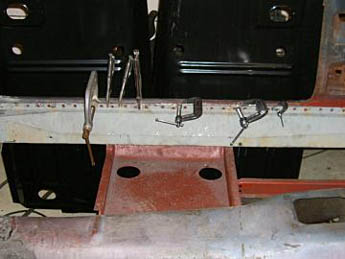
At this point, jack the car up and install a jack stand under the frame rails beside each torque box. Place an additional jack stand under the radiator support to hold the weight of the front end. Place another jack under the rear of the car for the same reason. Jack the car up in stages. With the drive train removed, it is possible to lift the front, the rear or an entire side of the car from a single lift point, which isn't good for a car with a damaged chassis. Ideally, the car needs to be somewhere between 18" and 24" off the floor. Below 18" can make it difficult to get under the car, while above 2 feet high makes it difficult to get inside the car to work. Also, the higher the car is, the more unstable it is, so higher is not necessarily better.
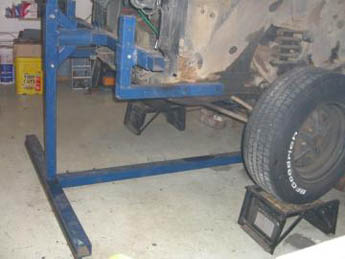
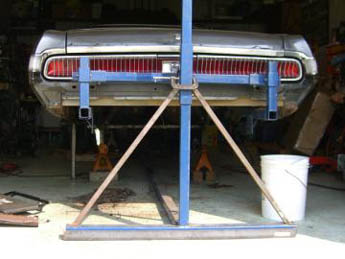 For this part of this project, I put the front tires on ramps (concrete blocks also work) to help stabilize the car. Next, the rear end of the car was jacked up until the car was level, then the stands were installed under the front frame rails. The tires are touching the ramps but the weight of the car is on the jack stands. 4-by-4 blocks and steel shims were used with the stands to get the weight on the stands and to ensure the car is level. The blue frame is a car rotisserie that I used to hold the front and rear of the car, instead of more stands. Note the angle iron under the bottom of the rotisserie at both front and back. The rotisserie also had to be shimmed slightly to properly support the weight of the front and back of the car.
The rear axle can't be used to support the car because the leaf springs allow the car to move and the rear leaf spring gets in the way when removing the inner rocker rail, so the leaf springs and rear axle are removed next. Drop the exhaust also, it will be in the way when it is finally time to install the new floor pans.
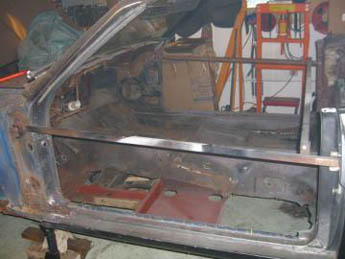
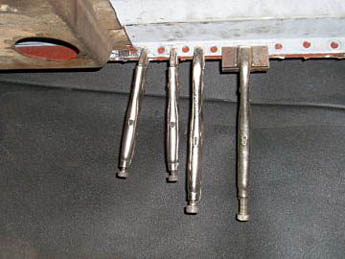
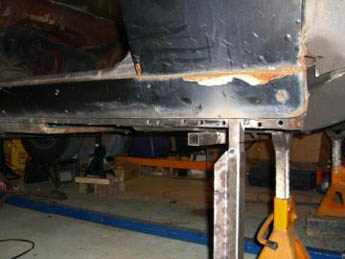 The side rail also needs to be supported, so stands were placed under each end of the rail. As with the other jack stands, shim as necessary to tension the stand. These jack stands (the black ones) are not holding the weight of the car, the ones under the frame rails (the orange and white ones) are doing that, but they should be tight under the frame rail to prevent the outer rocker panel from sagging when the inner rocker rail is cut out. Another option to support the side rail is to weld tubing to the outside of the pinch rail, as shown on the right.
Reinforcing the chassis comes next. Weld braces between the two front frame rails, between the two rear frame rails, and a third brace from the engine frame rail to the rear frame rail to prevent the car from buckling or spreading during repairs. The braces need to be stout, particularly the front to rear brace. Two-inch square tubing is recommended for the front to rear brace. Two-inch square tubing works well for the side-to-side bracing, although smaller tubing or even some 1" angle iron will work for these braces. Reinstall the plate between the convertible floor pan supports for extra reinforcement.
 While the bracing is optional, it is a really good idea to install bracing to help keep everything aligned while the car is cut apart. It is better to spend $40 now on bracing than $400 later on a frame alignment. I got in a hurry and forgot to add the front to rear brace before I started cutting, hopefully this omission won't come back to haunt me.
Installing the braces completes the preparation phase, which took about two days with the help of a friend. Plan on at least a third day if you are working solo.
Out With the Old
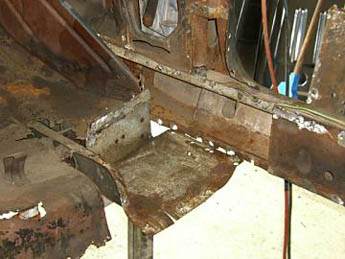
With the Cougar now ready, it is time to start removing metal. The first item to remove is the seat support. It is welded to the inner rocker rail, floor pan and transmission tunnel. Draw lines from the edges of the seat support all the way up the transmission tunnel, these lines will serve as reference points when re-installing the seat support. Drill out the spot welds holding the seat support to the floor and to the inner rocker rail, and then cut the welds at the tunnel. If the seat support is in good shape, set it to one side. Otherwise, it is the first item to go into the scrap metal pile.
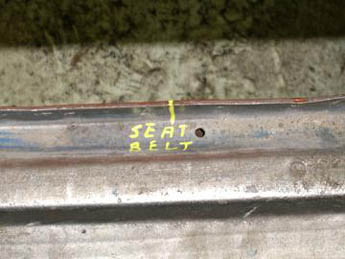
 Before removing anything, add reference marks to ensure the new parts go back in the right place. Mark on the outer rocker rail where the where the seat belt bolt is supposed to line up. This will make lining up the rocker rail in the right place much easier when it is time to install it. The seat support and floor pan have already been removed in the second photo but the reference line (the red line) is still clearly visible on the transmission tunnel. Make sure these reference marks are not accidentally removed before the replacement parts are re-installed.
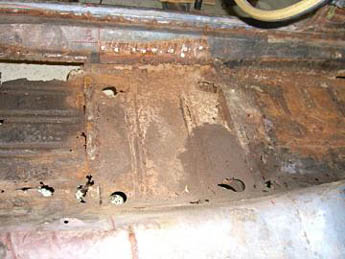 Removing this seat support was pretty easy. After drilling out the spot welds to the inner rocker rail, the seat support was lifted up and down a couple of times to break the spot welds on the transmission tunnel. The seat support came out so easily because the bottom edges of the seat support at the front and back had rusted completely away. Please note that normally there are a series of spot welds about 2" apart along the front and rear lips that have to be drilled out in addition to the ones on the sides. The floor pan underneath wasn't in any better shape that the exposed portions—water leaked underneath the support and rusted large holes into the floor, too.
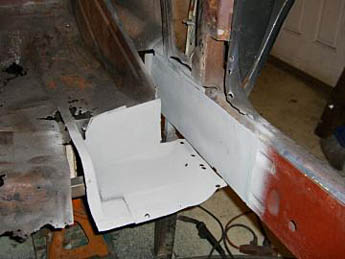
 The floor pan comes out next. Cut the floor pan out along the edge where the floors meet the transmission tunnel. Replacing floor pans will be covered in another article, but they need to be cut out now to provide access to the inner rocker rail. Only cut out the floor on the side being worked on, let the other side stay in place and help keep the car straight for as long as possible. Even if there is rust in the transmission tunnel, do not cut away transmission tunnel sheet metal yet.
Now, the old inner rocker rail is ready to come out. To get the old inner rocker rail out, start by drilling out all of the old spot welds along the top and the bottom of the rocker rail. They can be drilled out from either side. There are two choices on drilling out the spot welds. The first choice is to drill completely through the spot welds with a regular drill bit, which allows the holes in the pinch rail to be plug welded to the new rocker rail when it goes in. The second choice is to drill halfway through the spot welds from the inside the car. This option preserves the original look on the outside of the pinch rail as the inner rocker rail is welded to the outer one from the inside of the car. The spot welds holding the front torque box, the rear torque box and the under seat support to the inner rocker rail also have to be drilled out. Just drill through these spot welds as the old inner rocker rail is being tossed.
 To simplify the job and because the front and rear torque box areas require special attention to remove the inner rocker rail, the inner rocker rail is cut out in sections. Cutting it out in sections also makes the process easier. Cut the center part of the inner rail away apart from just behind the front torque box to just in front of the rear torque box. Remove the inner rail center section out of the car. The center section of the rail also can be cut in half to make removal easier.
When cutting out the inner rocker rail, take care not to cut through the flat section of metal that is the inner side of the side rail. While replacement inner rocker rail comes with a replacement piece, do not remove this flat section, at least not yet. Use a hammer and chisel to remove the inner rocker rail pieces from between the front and rear torque boxes. A pry bar can come in handy also but take care not to damage the outer rocker rail.
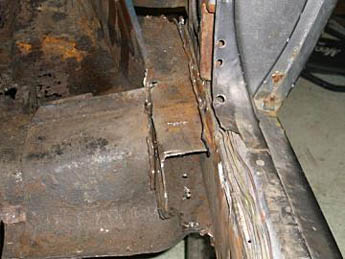
After the middle section of the inner rocker rail is removed, the ends sections are cut out next. The section by the rear torque box is a little more accessible, so it is attacked next. The first step in removing this section is removal of the convertible quarter panel reinforcing brace (this is what I call it—I'm not sure what Mercury called it).
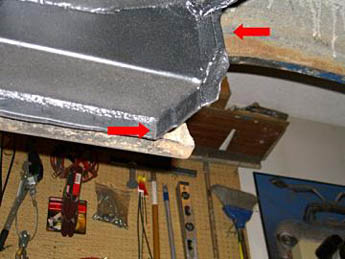
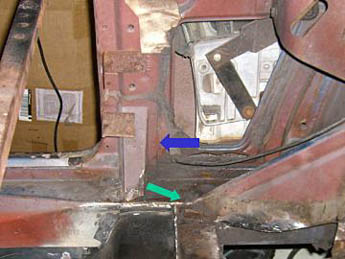 This brace (blue arrow) sits on top of the inner rocker rail and must be removed to get the inner rocker rail out. It is spot welded in the door jamb and around the edges. Drill these welds out with a spot weld cutter. Using a regular drill bit to drill through both layers of metal will make later re-installation quite difficult. Don't forget to cut the welds on the tabs connected to the torque box and top of the torque box. This photo is of the passenger side brace because I forgot to take a photo of the driver side before removing it. Once the brace is out, put it to one side as it will be cleaned up and reused.
After the little brace is out, drill out the spot welds that connect the end of the convertible top frame reinforcing brace (green arrow, photo above) to the inner rocker rail. Normally there are 3 to 5 spot welds holding the end to the inner rocker rail. Drill out the spot welds in the inner rocker rail underneath the window area next. Use a hammer and chisel to cut the remaining ones apart. If you have access to a die grinder, use it with a carbide burr to grind the spot welds away. A die grinder is the preferred option as there isn't enough space to get a right angle drill in there and it doesn't stress the vehicle nearly as much as hammering on a chisel, but the hammer and chisel will do the job if that is all you have.
When the top spot welds are separated, go underneath the vehicle and drill out the spot welds holding the torque box to the inner rocker rail. In addition to the spot welds, there is a tab behind the torque box near the spring perch that is seam welded to the inner rocker rail (photo, below right). Cut the welded seam on the tab while minimizing damage to the tab as much as possible. If the edge of the floor pan is welded to the inner rocker rail, the floor pan has to be separated from the inner rocker rail also. The easiest way is from the top using a chisel to separate the metal, although in some cases this small area isn't welded to the inner rocker area but is simply butted up against it and sealed with caulk so cutting may not be required.
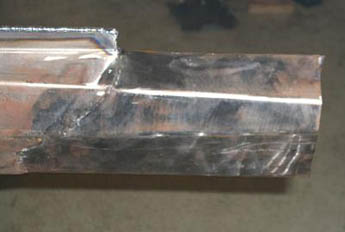
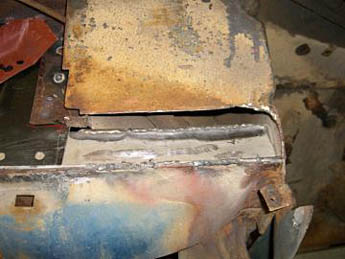
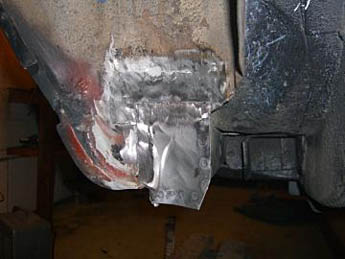
The final area to free is the back of the rocker rail. In many cases this area is already rotted, which at least simplifies removal. The inner rocker rail butts up against the wheel well, and the end has a cover plate welded over it to reinforce the area.
 It doesn't look that bad (left) at first, but when the outer cover plate and wheel well sheet metal are cut away, the extent of the damage becomes visible. The only flange in good shape is the lower one, the rest have rusted away. The flange on the left is part of the side rail, which means it will have to be repaired before the new inner rocker rail is installed. The tab on the bottom of the torque box can be seen in the photo on the right, beside the spring support and already has been cut free in this photo.
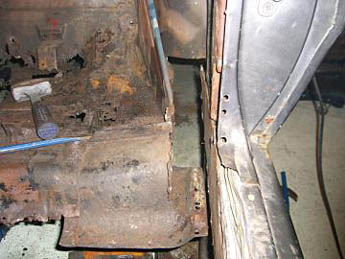 When all the top and bottom spot welds are cut out and the inner rocker rail side rail is cut away from the torque box, the end section of the torque box can be removed. Like the middle part, some hammer and chisel work will be required to get the end of the inner rocker rail out.
With the middle and end out, only the front part of the inner rocker rail is left to deal with. Unfortunately, the front section of the inner rocker rail is the hardest section to remove because it is tucked completely inside the front torque box. Start by drilling out the spot welds in the lower pinch rail and the spot welds connecting the lower flange of the torque box to the bottom of the inner rocker rail. Use a hammer and chisel to separate the flange of the torque box from the inner rocker rail. On this car, that proved impossible because too much of the lower part of the inner rocker rail was rusted away. So, a portion of the bottom of the torque box was cut off to expose inner rocker rail. As it turned out, the damage was limited to just the bottom of the inner rocker rail.
With the rest of the inner rocker rail in good shape, the original plan to cut off the entire bottom of the torque box to gain access to the inner rocker rail was modified. Instead of cutting the torque box apart and then hacking, beating and cutting out the last section of the old rocker rail, the new inner rocker rail will be modified so that it will slide inside the three good sides of the inner rocker rail that remains inside the torque box. The advantage of this option was that it keeps the outer rocker rail attached to the car by more than just some thin sheet metal while it is being hammered and hacked on to get the old section out. If the front torque box had also been rotted, the easier option would have been to weld in additional braces between the engine frame rail and the outer rocker rail to prevent it from moving, and then cut the front torque box and inner rocker rail out. With the front torque box in good shape, a less work-intensive option was chosen.
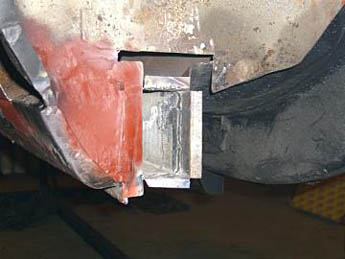
 The front end of the new frame rail was modified to slide inside the original torque box. The top edge was also cut off and the seam welded flush, but the bottom side and lower edge are not modified.
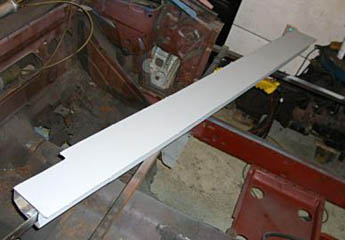 With the end modified, the new inner rocker rail was coated with a cold galvanizing compound and holes were drilled about 1 1/2" to 2" apart along the top and bottom pinch rails of the rail. Here, it is shown after being coated and just before it was drilled.
The replacement inner rocker rail is now ready to be installed. Unfortunately, the convertible car is still not ready for it. The inside of the outer rocker rail and the rear torque box cover both need to be addressed first. As mentioned earlier, there is a single sheet of metal between the inner and outer rocker rails. This sheet of metal is really part of the outer rocker rail but the replacement inner rocker rail also comes with a replacement sheet of metal for this part of the outer rail. If the original flat sheet of metal is bad, it needs to be removed. However, the new metal doesn't seem to be as thick as the original, so keeping the original metal is preferred, if possible.
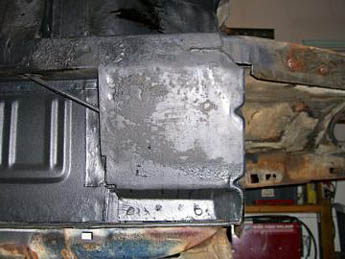
 The flat sheet between the inner and outer rocker rails was in good condition in this car except for the area from just behind the rear torque box to the end of the rail. To simplify the repair, a section from the end to the just in front of the torque box was removed. A replacement piece was made out of 14-gauge sheet metal left over from another project and welded in. The gray paint is cold galvanizing compound, not primer, while the red paint is Eastwood's Rust Encapsulator. The top of the rear torque box is already removed in these photos, that repair will be discussed next.
With the original side rail now repaired, the rear torque box cover is the last item to fix before the inner rocker rail can be installed. This repair can be done either before or after the replacement inner rocker rail is installed, but is it much easier to replace with the inner rocker rail out. Replacing a rear torque box cover is the subject of another article but it mentioned now because this point in the restoration process is the best time to repair or replace a damaged rear torque box cover.
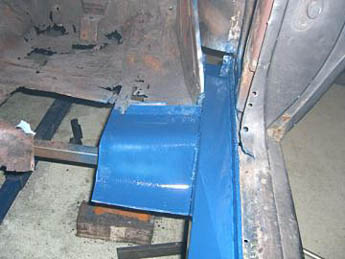
After the torque box cover is in, the convertible is finally ready for the installation of the replacement inner rocker rail. In this car, both the original flat sheet of metal on the outer rocker rail and the new flat sheet of metal are going to be installed. This solution butts two long flat sheets of metal together and creates a breeding ground for rust, so the existing metal, including the inside of the front torque box, was coated with a "Rust Encapsulator" (POR-15 is another good choice) and, as noted earlier, the new metal was coated with a cold galvanizing compound to reduce the chances of rust forming.
Putting the replacement rocker rail into the car is actually pretty easy. From the top of the car, slide the nose of the inner rocker rail into the opening between the front torque box and the convertible floor support. Line the rail up and then tap the nose of the rocker rail up into place while tapping the rear end downward, making sure the seat belt bolt lines up on the mark on the frame rail made earlier.
 Once the rail is in place, use clamps to pull the inner and outer rocker rails together (left). Use a hammer and dolly to ensure that the two pieces are flush against each other. This requires removing the rail a couple of time to get everything hammered flat. Once they are flush against each other, use vice grips or clamps between the holes to pull the pieces tight, then plug weld the inner rocker rail to the outer rocker rail. Starting in the middle section and working towards the ends, repeat the clamping and welding process until the inner rocker rail is fully welded to the outer rail. Alternate welding on the top and the bottom to reduce the chances of the rail warping due to heat.
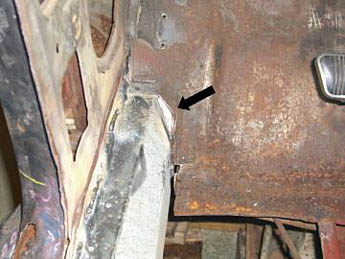 Because I have a relatively small welder (120V 90A), and I wasn't happy with the penetration I got on some of the spot welds, I also welded the top and bottom seams together to ensure a solid connection. There was also a small gap between the front torque box and the inner rail that had to be welded shut. If this occurs, cut small piece of metal to fill the opening, then weld it in. Here the seam can be seen already seam welded and the filler piece (black arrow) in place ready to be welded in.
With the inner rocker rail now re-attached to the outer rocker rail, there are only a couple more items to do to finish installing the new inner rocker rail. One item is at the front torque box. Weld the front edge of the torque box to the inside of the original rail. If the front torque box was removed, either partially or entirely, finish welding the inner rail to the outer rail, then install the new torque box.
 The new inner rocker rail is welded to the outer rocker rail with a combination of spot welds and seam welds. First the holes in the lower edge were plug welded to the outer rocker rail and then the other edge was seam welded to the part of the original rocker rail that was left inside the torque box. The edge will also be seam welded for added strength. The red item on the left side of the left photo is the piece of the torque box that was cut out to get access to this area. When the inner rocker rail is welded it, the cleaned up original section is put back in place and welded in.
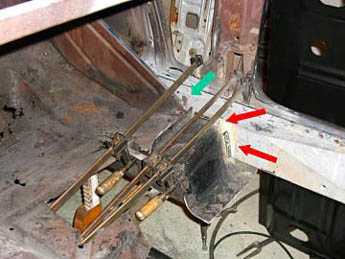
 The final section on this project is welding the back of the inner rocker rail to the rear torque box and closing the hole in the wheel well. First, weld the edges of the torque box to the inside of the inner rocker rail. Use clamps to close any gaps before welding. Weld the inner rocker rail to the torque box at the top and front (red arrow) and to the convertible top frame reinforcing brace (green arrow).
The convertible quarter panel reinforcing brace goes back in next. Clean up the part and straighten the edges if it hasn't been done already, then put it in place. Use the holes drilled in the door jamb and window opening to remove the brace as references to put it back in the right location. Weld the brace to the door jamb, to the inner window opening, and the inner rocker rail, basically all the locations it was welded to previously.
 Pay close attention to the welds in the door jamb, some of this area will be visible even after the carpeting is installed. This is the last item on the top of the inner rocker rail to go in. Please excuse the color swap (blue to black), this photo was taken after the entire project was completed.
On the underneath of the rear torque box, weld the torque box to the inner rocker rail by plug welding the holes drilled to remove the old inner rocker rail, except for the first one or two holes. The end of the floor pan is sandwiched between the torque box and the inner rocker rail, if these first holes are welded shut now, the floor pan will not go in properly.
Also underneath the car, weld the tab by the leaf spring mount to the inside of the inner rocker rail. The last bit of welding required is inside the wheel well, a replacement cover over the end of the inner rocker rail needs to be added.
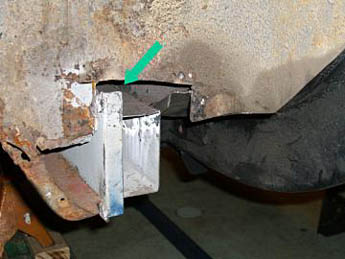
 This is the final spot on the inner rocker rail needing repair. Unfortunately I made a mistake when installing the inner rocker rail. I cut square to the lip of the inner rail to match the fold made in the replacement piece of the outer rocker rail, but the end of the inner rocker rail needs to be angled. For reference, the end of the rail needs to look similar to the one on the right, which is end of the passenger side inner rocker rail of the same car, as seen from underneath.
The correct way to make this repair is to install the inner rocker rail and allow it to extend into the wheel well (temporarily hammer the tab [green arrow] out of the way), then mark cut the end at the correct angle, use the wheel well sheet metal as a guide, while bending the extra metal area over to create the tabs shown in the photo (red arrows). Since I didn't do it right the first time, I had to make an extension to the new inner rocker rail and weld it in.
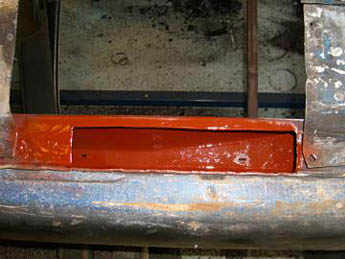
 This is approximately how the end of the inner rocker rail should be shaped (left). Instead of square, it should be tapered to match the angle of the wheel well. While the weld on the outside was ground smooth, the inside is cleaned but left high for extra strength. Once the end is at the correct angle, cut a piece of sheet metal to replace the wheel well area cut away and weld it in. When that is done, cut a new cover plate (approximately 5 3/4" by 3 5/8") (right) and weld it over the end. Clean up the welds, prime and paint the repair, and then coat with two to three layers of undercoating when the paint is dry.
This completes the installation of the inner rocker rail, which means the car is ready for the new floor pans. However, since the installation of the replacement rear torque box covers was glossed over, that will be the next item covered in the restoration of this convertible.
The Dark Side
While frowned upon, it is possible to patch an inner rocker rail. It is frowned upon because if not done properly, the car may look better but not be any stronger than it was before the repair. The key to patching a rocker rail is the inspection of the rocker rail. The entire rocker rail must be inspected, particularly the inside of the rocker rail, and all damaged areas must be replaced. For a small area, such as the one below, the rusted area was cut out and a section of new metal of the same thickness was welded in.
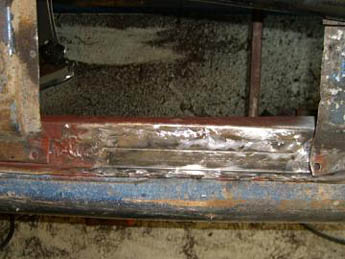 This patch is on the passenger side. A small pitted area on the underside of the rail was found when the floorpan was removed. The suspect area was cut out, then a flashlight and a small mirror on a rod was used to confirm that the damage was limited to this small area. If the inside of the rail had been severely pitted, the entire rail would have had to be replaced. Fortunately this was the only damaged area, which was cut out and then Rust Encapsulator was sprayed inside the rail for as far as possible before the replacement metal was welded in.
One other option, which I hesitate to mention but will for completeness, is replacing the entire bottom of the inner rocker rail. It is possible to cut away the bottom side of a damaged inner rocker rail, insert square tubing in its place, and then weld the tubing into the car. The only advantage to this option over replacing the entire rail is that the side rail is not completely disconnected from the car during the repair. Having repaired an inner rocker rail in another convertible this way, I can confirm that it is just as much work as replacing the entire rail, and definitely more hassle, because the tubing has to be cut down to fit inside the rail, the seat belt mounting nut has to hand fabricated, and that it is harder to get the square tubing slid into place and lined up than installing a new inner rocker rail because the square tubing has to be inserted from inside the wheel well and driven into the inner rocker rail area with a sledgehammer before it is welded in. Also, this option only works if the upper half of the inner rocker rail is in good condition, which is rarely the case with a rusted rocker rail. In most cases the side of the rocker rail will also be thin or rusted away, which is why replacing the entire rocker rail is the right way to repair a damaged inner rocker.
Bruce Habel is the DCC Technical Adviser. He may be reached at restocat@earthlink.net