Armor Plate Your Cat's Tank
Ford might have had many "better ideas," but making the top of the gas tank double as the trunk floor in early Cougars and Mustangs wasn't one of them. The design provided no barrier between the rear seat passengers and fuel supply in a wreck, added nothing to the body's structural integrity and exposed the tank to risk of puncture.
Enter "Tank Armor," an 11-gauge steel plate custom fit to sit on top of the fuel tank in your cat's trunk, strengthening the trunk floor and providing added protection to occupants if the car is involved in an accident.
I ordered a Tank Armor kit for my 1967 Cougar from Autoworks International, of El Cajon, Calif. On its Web site, Autoworks says it sells Tank Armor to fit 1965 to 1970 Mustangs and 1967 to 1968 Cougars. Because I installed a larger, 22-gallon 1970 Cougar tank on my '67 project car, I called Autoworks first to confirm that the '69-'70 Mustangs kits fit Cougars; they do.
In fact, all the kits are interchangeable from Mustang to Cougar, assuming an original fuel tank. Regarding my tank swap: The '70 tank bolts in with only a few modifications (cutting a small piece off the end of the 1970 filler neck and drilling new holes in the mounting base on the neck to allow it to fit the four screw holes in the 1967 trunk back). Note that the 1970 tank sits slightly higher in the trunk than the 1969 tank, which sits higher than the 1967 to 1968 tanks.
The tools you'll need for the Tank Armor installation are a socket wrench; 7/16-inch deep socket; 7/16-inch open/box end wrench; flat head screwdriver; 5/16-inch socket for removing screws that hold the filler neck to the back of the trunk; a power drill and 5/16-inch drill bit; and a hacksaw or cutoff wheel.
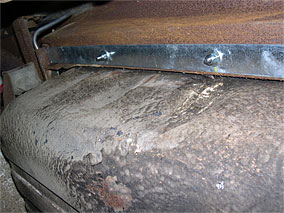
image A
The kit includes the armor plate, bolts, washers and nuts to replace the original screws that held the tank down, and a padded collar to sit between gas tank and bottom of Tank Armor around the filler neck. I also purchased separately four pieces of zinc-coated 1/8-inch by 1-inch by 36 inch steel bar from a home improvement chain to reinforce the area underneath the trunk (image A). To accommodate the added thickness, I bought longer bolts—1-inch, 5/16-inch head and 7/16-inch nut.
Cautionary note: You can't be too careful when working around gasoline—don't smoke and do all your cutting or drilling far away from the gas tank. Wear safety glasses or a face shield, and gloves when doing any cutting or drilling.
Steps for tank armor installation:
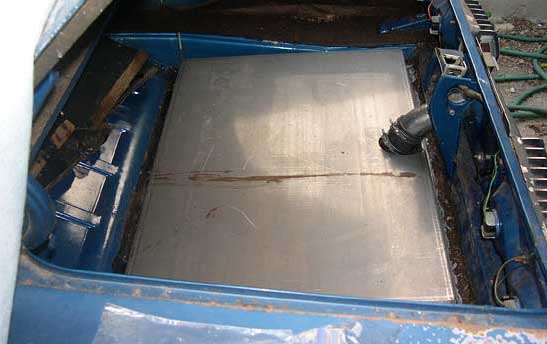
1. Remove the trunk mat and all contents in the trunk to reveal the top of the tank.
2. Use the 7/16-inch socket to remove all old screws holding the fuel tank in the trunk.
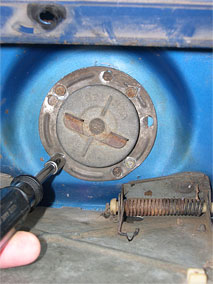
image B
3. Use the flathead screwdriver to loosen the clamps around the black rubber hose that connects the filler tube to the fuel tank. Gently twist the black hose to make sure it's loose and will detach from the tank.
4. Use the 5/16-inch socket to remove the screws holding the filler neck flange to the back of trunk (image B).
5. With the filler neck unattached, twist it to disconnect the black hose from the tank.
6. Peel the backing off the padded collar from the Tank Armor kit and carefully align the adhesive backing around the fuel tank collar where black hose connects.
7. Lift the Tank Armor (you might need a friend to help—it's a bit heavy) and carefully place it over top of the fuel tank, and line up the hole in the tank armor to fit over the collar on the fuel tank (image C).
8. Once you've set the Tank Armor in place, line up its pre-drilled holes with the holes in the fuel tank rim. You can use a thin Phillips head screwdriver if you need to get the tank armor holes to line up with the holes in the trunk—just insert the screwdriver into both holes and carefully pry to shift the tank armor into place.
9. Take the bolts from the Tank Armor kit and screw them down through the Tank Armor and holes in tank and trunk.
10. Re-attach the black rubber hose to the fuel tank and reattach the filler neck to the back of the trunk, tighten all screws you removed earlier and replace the gas cap.
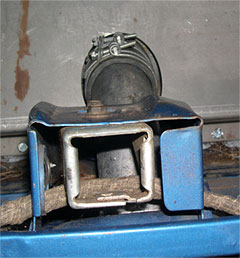
image C
11. With all bolts in, if you decide not to make your own extra reinforcing steel bars underneath, then you can just get under the car with socket wrench and 5/16-inch deep socket, washers and nuts, and screw the washers and nuts onto the ends of the bolts protruding through from above. With all nuts tightened, you're done with the installation.
12. If you do want to add the steel bar stock to reinforce the underside lip of the trunk around the tank, you have some cutting and hole drilling to do before you attach the washers and nuts.
13. Get a felt tip pen or grease pencil to use for marking your steel bars, and make sure the bars are in reach as you get under the car from the back of the trunk (you may want to wear safety glasses or goggles, as a lot of loose dirt and crud can drop on you while you're under the car). Look up and locate the bolts sticking down around the edges of the fuel tank. Hold one of the steel bars along one of the four sides and determine how long you want the bar to be, then mark where to cut it. Repeat this step to mark each bar for cutting, but cut the bars one at a time and check the fit again before you cut the next. Make your cuts with either a hacksaw or a cutoff wheel, if you have an air compressor or a Dremel-style cutoff tool. You may find you'll need to work around some obstacles, such as the fuel line and fuel sending unit harness. Once you have a bar cut to length, get back under the car and hold the bar along side the bolts, and mark the bar for the center of each bolt. Use your 3/16-inch drill bit (or a bit at least big enough to fully accommodate the bolt) and drill one hole, then test fit it under the car. Mark where you need to drill the next hole, and repeat the process with each bolt and with each bar in turn (yep, you're going to be crawling under the car a lot!).
14. Once you have a bar cut and drilled, get your washers and nuts within reach, get under the car, position the bar, get a washer and nut and bolt the bar in place. Get your socket wrench and 7/16-inch deep socket, washers and nuts, and tighten a washer and nut onto each bolt. With all nuts tightened, you're done.