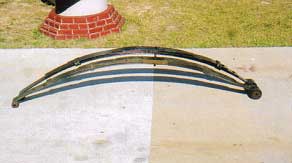
Cougar Leaf Spring Replacement
Replacing rear leaf springs is not a complex task. Remove a couple of nuts and bolts, and the old ones will come out.
The occasional problem is the pair of bolts at the front of the leaf springs. Sometimes they get rusty and stick inside the front eye bushings. When this happens, this job goes from about a 2 on the difficulty scale to about a 7. But with some preparation, a little luck and some help from a friend, replacing the leaf springs should take less than four hours. If those front eye bolts don't stick, cleaning the parts that are reused takes more time than installing the new leaf springs.
The most important part of this job is preparation. While some of the parts are somewhat heavy, the work isn't complex by any means, so anyone with a willingness to work and a basic knowledge of cars can do this job. A second set of hands is extremely helpful, but isn't required.
The first step is to order new parts. Besides the leaf springs, order new front eye bushings, new shackles, new bushings, new U-bolts, and leaf spring pads, both upper and lower. While some of the original stuff may be reusable, most of these items will be rusty, rotted or simply worn out. It is not uncommon for the U-bolts to shear off instead of the nut coming free and the same is true with the shackles.
While prices will vary with the vendor, here is what went into this project, a 1969 standard hardtop equipped with a 351 and AC. These items in the table were purchased from ESPO Springs in April 2006.
| Part | Cost | Quantity | Total | Notes |
| Rear Leaf Springs | $140 | 1 pair | $140 | |
| Front eye bushings | $12.95 | 1 pair | $0 | Included in cost of leaf springs |
| Shackle kit | $24.95 | 1 set | $24.95 | |
| Shackle Bushings | $1.50 | 1 ea | $0 | Included in cost of shackle kit |
| Shipping | $9.89 | 1 ea | $9.89 |
I forgot to order replacement leaf spring pads, which are $15 each (four required), but fortunately, the current ones were in good condition. I have reasonably new U-bolts on this axle, so I didn't need to purchase them again either, but plan on about $4 per U-bolt (four required). A new bolt and nut set for the front eye bushing runs about $3.50 (two required). Total cost for this car was just under $175. But, if everything had been replaced, the cost would have been a little more than $250. Vendor prices vary a lot also—the highest quote for a pair of leaf springs was $399. The bushings used here were rubber; expect to pay more for polyurethane bushings.
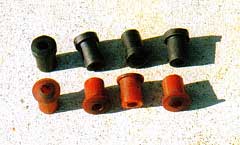 The red shackle bushings (bottom) are polyurethane, while the black bushings are rubber. It is generally not a good idea to mix and match poly and rubber bushings on the same suspension member due to their differing rates of flex. But having rubber eye bushings and poly shackle bushings is generally a good (and safe) compromise between a soft ride and less suspension flex.
Hollander's Exchange manual indicates that all '67-'73 Cougar springs are the same length and width. That doesn't mean that they can be swapped from one model year to another without issues, though. The spring tension is different for Cougars between years and even within a model year depending upon the engine and performance package installed. Swapping springs from another Cougar might be a short-term fix, but the correct solution is ordering new springs specifically for your Cougar.
The second part to preparing for this job is to soak the nuts and bolts with a good penetrating oil every day for three to four days prior to swap day. Since all of the bushings are being replaced, don't worry about getting oil on them. Pay particular attention to the front eye bushing bolt. Spray between the leaf spring and the leaf spring mount on both sides of the spring. The purpose here is to get the penetrating oil to soak the entire length of the bolt. The bolt goes through a metal sleeve and, when rust forms, it can seize the bolt to the sleeve. Getting the penetrating oil to soak as far down the bolt as possible is extremely beneficial in getting the bolt out of the bushing. Also, soak the U-bolt nuts and the shackle nuts, but pay the most attention to the front eye bushing bolts.
If for some reason the eye bushings are not installed prior to shipping, install the new leaf spring bushings into the front eyes before starting this project. There is a special tool just for this job, but there are easier ways than searching for a parts store that has one in its tool loaner program. One way is to wedge a small chisel (or screwdriver) into each side of the eye bushing and tap the bushing into place. Another option is to freeze the bearing for a couple of hours and then quickly tap it into place. Put a 2x4 on top of the bushing to prevent hammering directly on the bushing. The bushing seems to heat up a lot quicker than it cools off, so have the spring ready before the bushing is pulled from the freezer.
The rear bushings should just push into the leaf springs. If polyurethane bushings are used, apply some anti-squeak grease on the inside of the bushings now, when it is easy to get to them. The replacement shackles also need be painted before they are installed. Clean the shackles to remove any oil on them and then paint or clearcoat them, depending on your preference.
| Required | |
| car jack | penetrating oil |
| jack stands (2 pr) | spray paint |
| tire chocks | hammer |
| regular screwdriver | long punch |
| 9/16" wrench/socket | ratchet |
| 11/16" wrench/socket | short extension |
| 3/4" wrench/socket | wire brush |
| safety glasses | 3/4" socket |
| medium length pry bar | lug wrench |
| medium duty grease | |
| Helpful/May be Required | |
| 1x2" wood block, 4-6" long | breaker bar |
| 2x4" wood blocks (2), 4-6" long | large pliers |
| 9/16" deep well socket | chisel |
| angle grinder | clear coat |
| angle grinder cutting wheel | primer |
| angle grinder wire wheel | |
| large hammer/sledgehammer | |
Removal
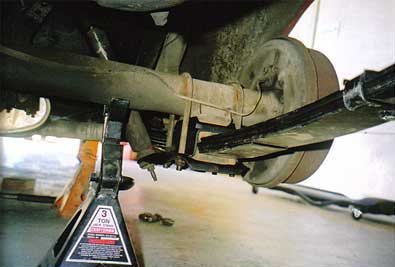
To start the swap, park the car on a level surface and block the front tires. Next, loosen the lug nuts on the back tires. Put the rear of the car on jack stands. Place the first set of stands right behind the rear torque boxes and in front of the front eye bushing mounts. Place the second set of stands under the rear axle, about 6-8" away from the leaf springs. This gives enough room to spin a wrench while still keeping the axle solidly balanced on the stands.
The front eye bushing bolts come out next. To get them out, first remove the rubber dust cap on the inside of the frame. Pushing in one edge with the regular screwdriver and then pulling the cap out seems to be the easiest way to get them out without damage. The head of the front bushing bolt is hiding behind this plug, which is why they have to come out. With the dust caps out of the way, install the 3/4" socket on the ratchet and extension and put the socket on the bolt head. Try to tighten the bolt about 1/8" of a turn. Sometime this will break the bolt free of the bushing. Not often, but you only get one shot at trying this particular trick and since getting this bolt out is the one item that can slow this job down the most, it is worth trying.
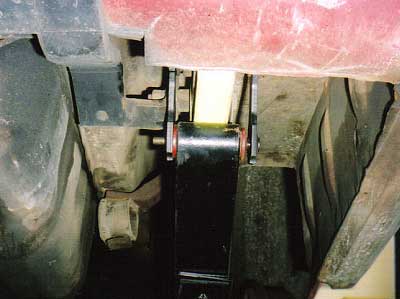
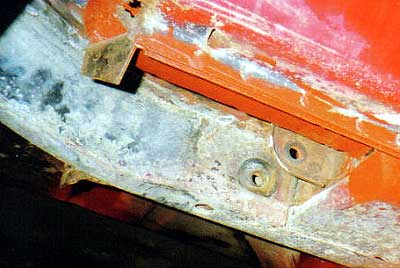 This '69 convertible is undergoing repairs on the side rail, but the photo clearly shows the mounting point for the front eye bushing. The bolt goes through the frame before going into the front eye bushing. If the spring has to be cut out, be careful not to damage either side of the mounting point.
Put the wrench on the nut and loosen the nut. Back it off until it is flush with the end of the bolt. Next, remove the wrench and try to turn the bolt about 1/8 of a turn. If the ratchet springs back, the bolt is still rusted to the axle bushing and will require more work to remove. If it turns, the bolt should come out later without a major fight. Repeat this process on the other side. The bolts, if they have not seized to the bushing sleeve, can come out now. But it is much easier to remove them after the leaf springs are unbolted from the axle, so just leave them in place for the moment.
Next, loosen the shackle nuts on each shackle. Do not remove them yet; there is enough spring pressure to bend the shackle if the shackle plate falls off. Don't worry if the nut shears off, the shackle comes apart, or both—it will be a little more difficult to get the shackle out later, but not impossible by any means.
Take the 9/16" wrench (a deep well socket works much better here) and remove the nut at the bottom of the shock. Hold the body of the shock while removing the nut. In a pinch, a large set of pliers can hold the shock still. This is one of the spots where an assistant makes the job go both quicker and easier. If pliers are used, put them down on the base, near the end of the shock. Denting a shock means replacing a shock, so be careful with them unless new shocks are being installed, too.
After both shocks are loose, place the jack under the leaf spring. It can go in front of the shock plate or behind it—either will work. Putting it under the shock plate isn't a good idea, as it gets in the way of removing the U-bolt nuts. Tension the jack to the bottom of the spring so it won't fall down, and then remove the four U-bolt nuts with an 11/16" wrench or socket. A breaker bar comes in very handy here and, in many cases, it is required because the U-bolt will sometimes shear before the rusty nut comes free. When all four nuts are off, remove the shock plate and the two U bolts. Lower the jack and pull it out from under the spring. Use a pry bar to remove the shackle from the spring and the frame. When the shackle is about halfway out, put the 2x4 blocks between the frame and the pry bar to regain enough leverage to finish getting the shackles out. Keep your arms, hands, and other body parts out from under the spring when prying out the shackle. The leaf spring is still under some tension, but the still-installed front eye bolt will force the spring to go straight down, so just stay out of its way and let it fall.
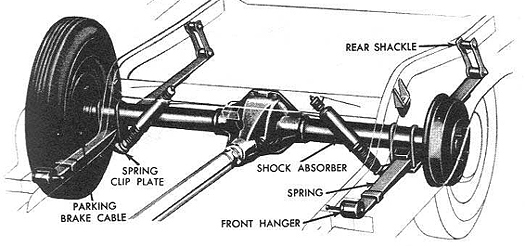
Leaf spring components (Courtesy Ford Motor Co.)
Back at the front eye bushing, use a hammer and punch to drive the nut flush to the leaf spring support. Remove the nut and tap the bolt as far into the bushing as the punch will drive it, then reach around the frame and pull the bolt out. Use the pry bar to wedge the spring out of the support. Do the same on the other side to get the other leaf spring out. The axle is probably going to twist on the jack stands. Putting a block of wood under the nose of the center section will prevent this, but it is easy enough to turn the axle to the correct position when installing the first leaf spring.
Unfortunately, a couple of hammer blows isn't always enough to free the bolt if it is rusted in; there is usually just too much rust between the bolt and the bushing sleeve for the bolt to come out. There are a couple of ways to get the leaf spring free, but it is going to take a fair amount of work and effort, no matter which option is chosen.
The first thing to try is a bigger hammer. It isn't successful all that often, but the next choices are even more time-consuming, so a bigger hammer is worth a try. Just don't knock the car off the jack stands or miss and put a big dent in the rocker panel with that sledgehammer.
If the hammer doesn't work, another option is cutting the spring eye apart with a cutting wheel and an angle grinder. Make a straight cut across the leaf spring right below the eye to cut away the majority of the spring, then make diagonal cuts across the bushing. A diagonal cut makes a deeper cut into the spring without hitting the leaf spring support. Use the hammer and chisel to finish splitting the metal and then cut away at the rubber part. While both smelly and messy, the cutting wheel is both easier and faster than using a knife. When the sleeve is exposed, cut it off as close to the support as possible, then use the hammer and punch to drive the rest of the bolt out of the support.
Yet another option is a reciprocating saw. It will take more than a couple of blades, because the bolt is hardened metal. But with some careful angling of the blade and some persistence, it can be done. Put the blade between the support and the eye bushing to cut the bolt instead of trying to cut the leaf spring apart.
It is possible to drill the head of the bolt, although this is probably the hardest way to get the leaf spring out. Besides having to exactly drill a 7/16" hole through the bolt head, the other end of the bolt has to be cut bolt off, and front eye support has to be pried apart slightly to get the spring out. Oh, and the exhaust and driveshaft usually have to be dropped to get enough space for the drill. It does work, but this method is probably best left for cars that are being fully disassembled for a restoration.
The only other option I know of is a cutting torch. The process is about the same as with the angle grinder, except there is a lot more flame and smoke involved. As open flames and gas fumes don't go together, the gas tank really ought to be removed first before the torch is lit. If the stubborn bolt is on the driver side of the car, be careful not to heat the fuel line either, which is about 1 inch from the spring support. This option is absolutely the last choice in my opinion, but it will work.
If either bolt is stuck, skipping down to the cleanup section is the next best use of your time. Cleaning up the old parts, painting them, and then letting the paint dry while fighting with the bolts is a much more efficient use of time than fighting the bolts out, then cleaning up parts, and then waiting for the paint to dry before continuing with the install.
Cleanup
The insulator retaining plate, the shock mounting plate and the axle wedge all need to be cleaned and reused. There can be a significant amount of rust on these parts that needs to be removed before the parts are cleaned and reinstalled. An angle grinder with a wire wheel does an excellent job of removing the rust and will save hours of scrubbing over a hand brush and sandpaper.
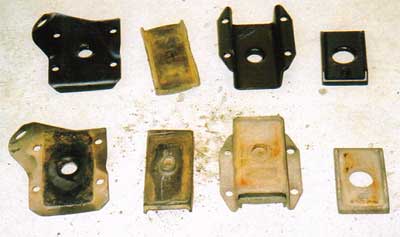 The freshly removed plates (lower) are in serious need of clean-up. But with a fair amount of elbow grease, they'll clean up nicely. The metal pieces are reused unless they are rusted through, but that doesn't happen often. But don't be surprised if they have severe pitting in a couple places. Pitting is common on the top, under the wedge and near the edges of the insulator pads. If you look closely at the third plate from the left (upper), you can see where rust that was between the spring and the insulator pad has eaten a shallow hole into the plate.
When they are clean, spray them with a rust inhibiting primer, such as Eastwoods' Rust Encapsulator, POR-15, or even Loctite's Extend Rust Converter. When that dries, a topcoat can be applied. There are also several types of paint that can be applied directly to metal that will work. With a little forethought, both POR-15 and Rust Encapsulator come in several colors and can be purchased in a close to appropriate color, although for that N.O.S. look, just buy the right color paint.
Since this car is a driver and not a show car, these items were painted black. If the car is being restored as opposed to being rebuilt, it will take a little more time to get the surfaces smooth and painted the correct color (Natural, I think). It also helped that I had a couple extras parts around and prepared the spare parts the night before so I didn't have to wait for paint to dry after I got the old leaf springs out. Powder coating is a good choice for these parts, but I killed my compressor last summer, so paint had to suffice. It took about 30 minutes of vigorous work with the grinder to clean up the parts and another two hours to let the various coats of primer and paint dry to the point where the parts could be handled. Don't forget to paint the U bolts, the front bushing bolts, and all the nuts. Drying times will vary depending with the brand of paint and primer, so read the labels and plan accordingly when purchasing these products.
It is also a good idea to clean up and paint the leaf spring mounting points, the underside of the mounts on the axles and inside the rear shackle bushing sleeve (in the frame rail), but it may not be necessary depending on their condition. Use an old screwdriver to pry out the remains of the old bushings and to scrape out any rust in the openings before painting the area.
Installation
This is the easiest part of the process, but there is one final check to perform before installing the new springs. Put a new spring beside an old spring. While the arch height will not be the same, the end-to-end length should be. Measure both springs to ensure that the spring company sent the right length springs. If correct, take the leaf spring and place the front eye into the leaf spring support. (If the lengths are not the same, it is time to grab the phone and place an irate call to the vendor.) Take the bolt and give it a liberal coat of grease before putting the front bolt into place and loosely installing the nut. Do not tighten the nut yet, it would prevent the spring from moving and could place an unwanted pre-load on the spring. The grease is to slow down the formation of rust, so put a coat on the bolt even if it is brand new.
 The new leaf spring (rear) is not much taller that the old one (front), which caused some initial concern, but the difference was immediately apparent when I stepped on each. The old spring sank nearly an inch more than the new one, and I weigh less than 170 pounds. The difference really became apparent the next time I filled the gas tank: The rear wheel lip no longer sagged down to the top of the wheel rim.
Put the upper insulator into the retaining plate and then put both on top of the spring. Line the hole in the insulator and the plate with the leaf spring bolt before pushing them onto the spring. Place the jack under the spring, then put the wedge on top of the retaining plate. It only fits one way (narrow end forward) Use the jack to lift the spring into place. If the axle has shifted, it will be necessary to go under the car and turn the axle back to level. Use the wood blocks to hold the center section in place if this is a one-person operation. Jack the leaf spring up until the wedge lines up with the axle mount and then jack the leaf spring up until they touch. Put the U-bolts back on the axle, one on each side. Make sure the U-bolts go under the brake lines to prevent pinching the lines. Put the lower insulator on the shock mounting plate and slide the plate onto the U-bolts. Install all four nuts finger tight.
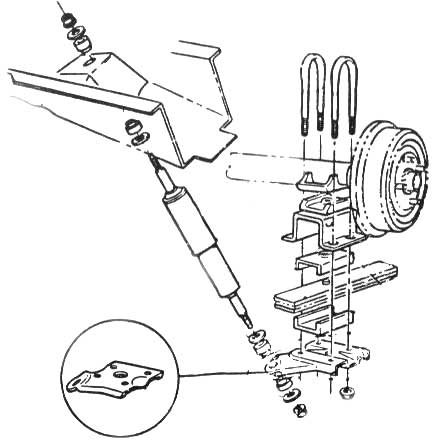
Spring perch assembly (Courtesy Ford Motor Co.)
Re-check the alignment, making sure the nut and bolt in the insulator are in the holes in the insulator pads, the pads are in the holes on the plates, and that the wedge is lined up with both the retaining plate and the mounting point on the axle. Tighten all four nuts, in equal stages, until the about half of the initial gap between the shock plate and the retaining plate is closed. It is possible to tighten them fully now, but it puts a lot of extra stress on the U-bolts, so I prefer to let the weight of the car compress the pads before I tighten them fully.
Next, take the 1x2 piece of wood and put it between the underside of the rear frame rail and the top of the rear eye. Take two new bushings and insert them into the frame, one from each side. Use the jack to lift the spring, which also pushes the eye rearward. When the gap has closed enough to insert the shackle into both the frame and the leaf spring, stop lifting. Lube the shafts of the shackle and insert it into the bushings in both the spring and the frame. Install the plate on the other side and tighten both nuts on the shackle.
 The piece of wood prevents the leaf spring from scraping along the frame and ruining the finish on either.
To reinstall the shock, first make sure the rubber insulator hasn't fallen off the shock, then insert the shock into the shock plate. Insert the second insulator, followed by the washer and the nut. Tighten the mounting nut until the insulators start to bulge slightly.
Repeat this process to install the other leaf spring. Remove the jacks from under the frame, leaving the vehicle sitting on the two jack stands under the axle. This compresses the springs to what should be the normal ride position. Tighten both nuts at the front eye bushings and all eight of the U-bolt nuts. Put the tires back on the car, re-install the two dust plugs back into the frame, and then remove the final two jack stands. Tighten the lug nuts to complete the leaf spring swap.
 The newly installed leaf spring really shows off all of the old dirt, but the car rides much better and I'm no longer scraping the undercarriage on hard bumps. This car is about to be rebuilt, so the big cleanup is coming. But the rear end was bottoming out way too often, so the rear leaf springs went in early.
Also check the ride height. The top of the wheel opening should be higher than it was before. It shouldn't be so much higher that the car now has a stance that resembles a stinkbug, though. If it is high in the rear, putting some extra weight in the trunk for a couple of weeks can settle the springs, but this doesn't always work. If they are too high, replacing the springs with a different set or having this set re-arched locally are about the only options available.
Finally, take the car out for a test drive on a quiet road. Start slow at first, but work in a couple of hard stops and sharp turns to get a feel for how the car now responds. There isn't any need for SCCA-level driving, just some hard movements to see how much of a difference the new springs will make. Also, put in a couple of miles on some regular roads and a couple more on roads with rough surfaces to see how much the ride has improved.
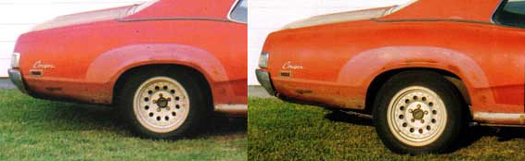
The rear end is a little higher in the after photo (right), but has since settled slightly. The car has only about one-eighth tank of gas in these pictures, so the sag isn't really noticeable in the before (left) photo. More important, the rear end doesn't droop 3 inches when I fill the gas tank; body sway has noticeably decreased; the ride is more comfortable; and the rear axle no longer hits the bump stops when I hit a dip in the road.
Bruce Habel is the DCC Technical Adviser. He may be reached at restocat@earthlink.net